Friday, December 29, 2017

Return to Bolt Action Game Night

This week saw return to Bolt Action after an extensive hiatus.  There are a few new players in the area, so we coordinated a game night at a local game store, Misty Mountain in Madison, WI.
French List
German List
We ended up with eight players and four games going.  My son Justin, who is home from college, brought his friend Austyn and they faced off U.S.vs. IJA.  Brian K. faced Brian B. U.S. vs British Commandos. Ben fought against Neil with Soviets against Germans.
Battlefield from the French Side
Phil felt up to the challenge of taking on my early war French with his early war Germans.  We rolled for a scenario and came up with Demolition.
French push up the center after deploying gun
I was placed my objective in a building and Phil placed his in a wood line sheltered by a stream.  We both had units in out flank my Vet Cavalry and FFL  and he had a 251 filled with Pioneers.  Phil also put his PzIV in reserve.
Char2C and Gun open on German in building
It was clear we were both very rusty on the mechanics, but it came back quickly with a few book references.  After we were done I realized neither of us had used the officer ability of "You men snap to it" to activate additional units which could have been useful on a few occasions.
Tank stand off
The Germans placed a squad defending the base along with a light gun.  After advancing a 2nd squad forward it quickly became pinned down in a building and was forced to go down as the Char 2C rolled up and concentrated some fire on it.

 I started out fairly conservative on the defense with the intent of leaving a regular squad, MMG, and light howitzer along with the Char 2C to defend my base.  Everything else advanced forward to threaten his base.
French press the center
I had to bring my FFL in on outflank on turn three to deal with the mortar that was threatening what was left of my Medium gun.

The Cavalry came in on turn four to join the FFL, and the remnants of my regular squad pushing through the center to threaten the German base.
German flank is in the air
The tank battle was a non factor with no real A.T. assets to knock them out.  The Germans did manage to pin the Char 2C which neutralized it for 2 turns due to horrible command rolls.
Panhard scores a critical kill
Turn five was critical as the Pioneers had to come in from outflank after failing on turn four.  I felt confident I could deal with this threat and take the German base by the end of the turn.  I did take the precaution of placing my Panhard in ambush.
German offense is quickly stunted
The Pioneers came in and the Panhard took the long range shot achieving a hit and acing the half track.  More importantly, this caused the pioneers to take a loss bail out and go down.
Defenders of France are poised to face any threat
At the end of turn five Phil realized resistance was futile as it was now impossible to threaten the French base and three units were in position to take his base by the end of turn six with little to defend it.
German base on the verge of capture
All in all it was a god game and nice to knock the rust off Bolt Action.  I plan to play in an event at the end of January and Adepticon in March, so I need to refresh myself on the rules.

The group plans to make Thursday evenings at Misty a regular thing again and I hope to make it at least twice a month.


Saturday, December 23, 2017

Thursday, December 21, 2017

Rorke's Drift Refight -Part 2

This week saw the epic conclusion to a truly great game of Black Powder Using the BP basic rules along with scenario specifics I found courtesy of another gamers blog (Eric The Shed).


You can find the scenario here:
Rorke's Drift Scenario


If you missed part 1 you can find it here:
Rorke's Drift Refight-Part 1


To remind you we had completed two back to back active phases with the Zulu inflicting some damage on the British defenders taking out three of twelve British units along with Color Sergeant Borne at the cost of only three of thirty nine war bands lost. 
British take advantage of the lull to regroup
The group reassembled with eight players total.  Mark, Rob Justin and Jared commanded the Zulu and Brian P., Brian C, Scott and Curt resumed command of the British.
Hospital set ablaze
This week started with Phase 3of 12 which had to be a passive phase per the scenario rules.  The Zulu recovered some morale, as did the British.  The British also redeployed consolidating their defenses and going back to work on some barricades.  The respite would not last long though as Zulu immediately returned after only one passive phase for a active phase.
Threat looms from the road
The Zulu attacked toward the hospital and up the main road in an attempt to gain the advantage.  a small contingent also broke off and came through the karal.  Again, the British found they had their hands full and had to abandon the work on the barricade wall to pick up their rifles and pitch into the battle.
Zulu close with British in the open
It was a close run affair and the Zulu were not able to gain a clear advantage.  As it was the third active phase the Zulu morale had lost the +1  and they quickly realized that breaking British units would be a tough road from here on out.
"To the angle Lads"
Two British units were put at  stamina and most had used their free break test, but the Zulu were quickly stacking up casualties as well.
"Drive em back Boys"
When it was clear that the steam was completely gone the Zulu wisely decided to withdraw.  In the process the defenders were able to pour in a galling fire causing even more carnage to the beaten down attackers.  When the smoke cleared it was realized that one of the four IMPI were broken and now out of the fight.
Reconsolidation during the lull
The Zulu now needed to take their time to reorganize and tend to the wounded.  As a result three passive phases were played in a row.  The British took full advantage in caring for their casualties as well as resuming building.  In the three phases that passed they constructed the redoubt and again went to work on the wall.
To Arms!  They are still out there
In was the start of phase eight and approaching midnight in the game.  The Zulu came back from three directions under the cover of darkness.  Visibility was limited to 12" and command was -1 for both sides.  The Hospital was still burning which provided some visibility, but otherwise the British were blind.
Zulu cautiously advance under the cover of darkness
The phase developed very slowly as the Zulu seemed a bit skittish to step off  with their attack as only one of the three IMPI involved made their command rolls the first three turns of this phase.  The British hearing noises took advantage to again abandon building barricades and redeploy to the yard outside the store house and around the redoubt.
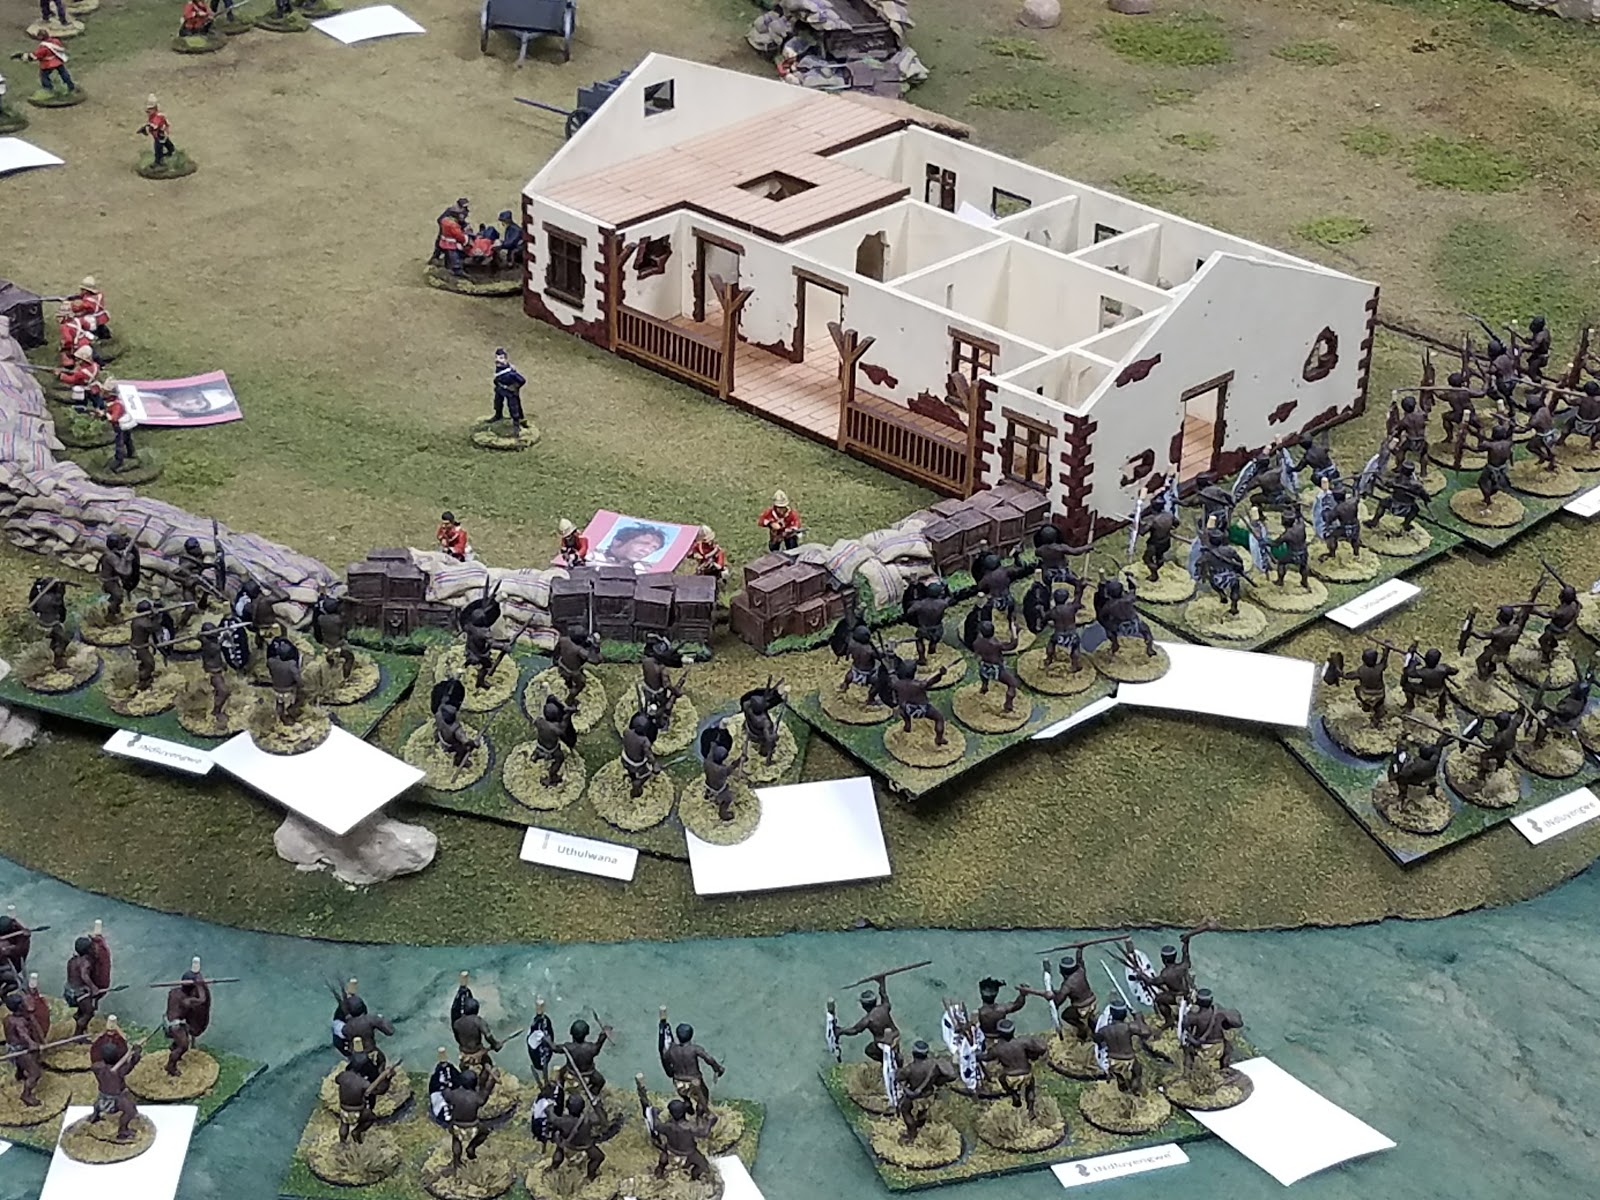
Here they come again......steady....steady ......FIRE!
Just when we thought it was becoming anticlimactic all three Zulu IMPI rushed forward to engage the Red Coats.  The store house was set ablaze and the Zulu swung around to attack again from the Karal, road, north wall, and through the store house simultaneoulsy.
Stout hearts can still win the day
Closing fire was limited to one round due to visibility and the Zulu were able to close.  The Queen's stout defenders held firm until a fatal chink in the armor revealed itself and a Zulu war band achieved an unlikely win.  To make matters worse the British defenders broke and ran when they rolled snake eyes.  Seeing this calamity unfold next to them the unit in support also broke and ran.  Bringing the total British units lost up to six.  The Zulu knowing they only needed one more unit to break or go to stamina were like sharks with blood in the water.
Weakness Exposed!
HUZZAHHH! (Justin, Rob, Mark, Jared)
The very next attack resulted in the already wounded British defender taking a third hit and going to stamina.  The British now knew the game was up.  Seeing as though it was already past normal quitting time three of them expressed their gratitude and left for the evening.  Kurt being a good sport decided to play it out for the remaining attacks to see the final bloody result.
Run Away...run Away!
Enough Already! (Scott, Brian C., Brian P.)
At this point the game looked very cinematic as the Defenders were pushed back to the redoubt with Zulu all around them.
Hold to the Last Lads....hold to the Last!
The remaining attacks were played out and in the end the British lost a total of seven units and had another at stamina giving  the Zulu a decisive clear cut victory by routing the British force per the scenario conditions.  There was a cost though as the Zulu lost a total of fifteen war bands which included the entire IMPI that was routed.
It was a good fight...there are just to many of them
All in all this was a tremendous game.  It was very back and forth with both sides at one point or another claiming the deck was unfairly stacked against them.  It is not often that we get to play a game out to clear cut victory conditions, so this was a very satisfying result for all involved, well OK maybe not all the British players.
Roll Call of the lost (7 Units + Borne, Chard, and Bromhead)
Full Credit to Eric who designed this scenario.   It is extremely well done and feels good while you are playing as it is equally tough for both sides.  This was by far the best the Zulu had done.  Both sides managed their troops well, setting the conditions for either side to obtain victory.  If not for a horrible break test we may not have been able to call this one a Zulu victory.
Turn the tracker I designed to keep track of the phases and 6 active phases
If you have the troops and the time I encourage everyone to give this scenario a try.  As I have all the terrain I know we will be coming back to it for future conventions or just a private game.


Sunday, December 17, 2017

Guilford's Courthouse (RFF AWI Variant) Part 2

After a lengthy break while Mark vacationed with family in sunny Florida the group reassembled to resolve this heated engagement.
Continentals re-establish control of the hill
You can find Part one here:

Gulford's Court House Part 1

We are using the Regimental Fire and Fury variant rules for AWI for this scenario.  If you recall the British have managed to roll up the Militia defenders with only a few militia units surviving.  The King's troops and are now facing the vaunted Continental third line under the direct command of Greene.
British close to close quarters
The Continentals had ventured forward last time to face the combined British and Hessian threat on the left with the support of the few Militia that made it back.  It was soon realized that this was a mistake as this new salient was now under fire from infantry as well as the Artillery Cornwallis had brought up.
British Artillery providing close support
The Continentals were able to withdraw, but sustained some serious casualties while inflicting casualties on the British attackers.  Both sides were now in heavy casualties and the the Americans had sustained greater losses.  As a result the game was a draw at this point as the Continentals held the key position.  The British only opportunity to win was to take the key position which was not impossible, but would be a hard road.
Continental right hold as British Legion charges.
Fortunately for Cornwallis the Americans were not able to inflict the casualties they previously had as the British units made their final assault.  It was now clear that the game was going to come down to the last turn and the Hessian unit was the last opportunity to snatch a victory away.
Final Assault goes in on turn 14 to decided the game
By the narrowest of Margins the Hessian broke through the Militia and with a break through charge were able to drive back the weakened continentals and gain the key position securing victory for the British and Lord Cornwallis.

Once again the group really enjoyed how RFF played for the AWI period.  We have provided some feedback to Rich (rules author) for some minor tweaks specifically on how cavalry could be adjusted for this period, but nothing that reduced our enjoyment of the game.

Playing this scenario reinvigorated my interest in the period.  So much so my next project is already underway.....Cowpens and the Southern Campaign.


Rorke's Drift Re-fight -Part 1

After hosting this scenario at ROCKCON it was time for a re-fight with our local group.  As I already own all the terrain and troops it is great when I have the opportunity to play with friends.  This time it was even better as both my sons (Justin and Jared) were able to join us for  the weekly gathering at Mark's.
Rorke's Drift with all defenses in place
For those that missed my previous post we are using a scenario I found on another blog as the one in the Zulu supplement is totally inadequate and would produce ridiculous results.  My guess is the author never even play tested it.  Each time we have played this revised scenario it has produced a great historical feel and enjoyable exciting battle.
Initial attack forming in the garden
You can find the scenario here:
Rorke's Drift Scenario
The Zulu began first assault phase with eight war bands attacking the drift.  The scenario allows for eight feints (turn 1 only), so the British defenders see sixteen total units coming at them and the fake units are not revealed until they are fired on by the British or the Zulu close to within 6" of the defenders.
Zulu close on the defenses by the hospital
During set up the British commander decided to assign 4 units to start building more defenses and spread the remainder of his units out along the perimeter.
A hard fight ensues
The Zulu attack came from the garden and moved to the right in order to attack the hospital area.  The Zulu quickly closed to hand to hand and drew the other British defenders to that end of the perimeter when they realized more Zulu were not coming immediately.  While there were some intense moments including a British unit breaking the Zulu withdrew when they realized they were losing steam.
Stalemate before Zulu withdraw
Wisely the Zulu commander came right back with a 2nd Active phase (scenario only allows 2 back to back active phases).  This did not allow the British to re-position defenders and allowed the Zulu to attack with fresh IMPI not involved in the first attack.  This time the Zulu came from the Karal area and launched a feint from the garden area.
Second Zulu attack enters the Karal
Unfortunately for the Zulu once the they reached the upper Karal they suffered some poor command rolls as well as the affects from disorder and were stalled.  The second prong were able to attack through the storage building and north wall and penetrate the Outer defenses.   The Brits then realized that the attack from the garden was a ruse this time.
Queen's defender redeploy to face the new threat
The British were able to hold off the onslaught, but paid a dear price losing two more units as well as Color Sergeant Borne who fell in combat.
A close run affair as Zulu gain the perimeter
The Zulu commander realizing his attack had again stalled wisely decided to withdraw.
Defenders are able to form a firing line
This is where the night ended with the first 2 active phases complete (Multiple BP turns in each phase) and we will pick up with at least one passive phase when we start next week.
A powerful threat still looms
The British have lost three units plus Sergeant Borne and the Zulu have only lost 3 war bands, but do have several at stamina.  The Zulu do have two fresh IMPI that have not been engaged in the fight yet if they choose the initiate another active phase right away after the required passive phase.

The British are certainly hard pressed with the loss of three units and the Zulu players are in high spirits.  Next week will be interesting.

More to come........

Part 2:

https://rallyroundtheflag.blogspot.com/2017/12/rorkes-drift-refight-part-2.html

Thursday, December 14, 2017

Figure Storage Solution-Literature Mailing boxes

Recently I have had many inquires on the boxes I currently use to store my miniature collections.  As a result I decided to document it in one location so I can more easily share what I use.
Bolt Action Army in 2" box
Like many of you I have acquired a wonderful collection of "Toy Soldiers".  Once I started completing my armies in miniature I also faced the question of how will I store and transport them?
My Storage Closet-Left Side


My Storage Closet -Right Side
I went through a few phases with my various collections to include Plano style plastic boxes, various types of foam trays as well as storage cases designed specifically for miniature war gamers.   As my collection grew, I came to realize that these solutions were becoming unwieldy and in the case of foam and storage cases vary cost prohibitive.  When the cost of the foam could fund additional armies I decided to make a change.
A portion of Mark's Collection
I looked to my long time friend and gaming mentor Mark who has been in the hobby for decades.  I am not sure if Mark knows how many "Toy Soldiers" he owns or just does not want to admit it, but his sizable collection is in the tens of thousands ranging different scales and periods from Ancients through WWII.
Standard 3" box with magnetic sheet
Mark has been using a unique and very affordable method of figure storage for years.  He custom builds storage boxes in varying sizes using sturdy flat shipping boxes (Usually used for Literature) lined with magnetic sheet (similar to what is used for making magnetic signs).  Mark and the gaming crew order materials in bulk to have on hand and keep the cost even lower.   He then assembles as needed for himself and other members of the group when requested.  Actual cost per box is probably around $5 in materials, plus his labor for which I gladly pay him.
Bulk Magnetic sheet roll (Adhesive back)
The boxes can be purchased in a number of sizes depending on your collection.  I prefer to use all the same with are approx. 16" x 12" and then either 2 or 3"tall.  The boxes are all lined with a magnetic sheet (adhesive backed works best) which is ideal as all my figures are already on metal bases/washers.  Mark then goes the extra step by inserting a piece of wood in the front of the box which the box flap slides in between when closed.  This prevents the box flap from ever contacting and wearing on the figures that are safely stored inside.
Box Bottom templates used for cutting magnet sheet easily
To go a step further we have designed nice labels which make it very easy to identify the contents and look great.
Front edge of box with wood insert for box flap
As Mark's collection is very large he has even custom built shelving to the dimensions of the boxes. This way only so many boxes are stacked together.   The metal figures based on washers and metal bases can get quite heavy.  The boxes are very crush resistant, but I would not recommend stacking more than four high depending on weigh of each box to avoid any damage to the boxes on the bottom.
Assorted boxes ready for use
At this point the majority of my miniature collections are now stored this way, with the exception of those that are not based like planes and such.  I am even in the process of building boxes for my naval fleets.
Bottom of Team Yankee 6mm Box (Note inserts for shelf)
Top of Team Yankee 6mm box with shelf in place
The boxes are excellent for home storage and work very well for transporting figures although I would not suggest dropping them or turning them upside down (not that I have had experience).
28mm Vehicles and troops in 2" box
In addition to what Mark created I have come up with one additional inspiration.  Mark uses smaller size boxes for his 15mm collections.  I also have 6mm (Modern) and 10mm (ACW) forces.  Since I want to keep my boxes all the same size it seemed like a waste of space with the really small scale figures even in the 2" tall boxes.  My solution was to use a 3" box and insert a 2nd layer/tray so I can essentially store twice as many figures in one box.
ACW 10mm Bottom

ACW 10mm Top (drawer knob for easy lift out)
I did this by simply inserting 1.5" wide strips along the lower inside of the box and down the middle to support a shelf.  I used tag/matting board to cut the shelf to size and then simply attached a drawer knob to the center so I can easily lift off the top layer which snugly fits in.  All my 10mm and 6mm figs are under 1" tall, so the 1.5" height works great.  I am also in the process of doing this with my 1/2400 naval fleets as the mast are not that tall.


28mm F&IW figs in 3" box to accommodate flags
The boxes can be obtained from a number of vendors along with the bulk magnetic sheet.  I have also purchased the magnetic sheet from a local sign shop, but it was much more expensive going that route.
28mm Soviet vehicles and Cavalry in 3" box
A simple google search may be able to help you find a local retailer or online vendor.  Mark was not sure which company he ordered form last as he has ordered in bulk and they last awhile.


Here are a few links if you do decided to order in bulk to get you started (encourage you to shop around):
Boxes:
http://www.globalindustrial.com/g/packaging/boxes-cartons/CorrugatedLiterature-Bookfol/literature-mailers


Adhesive Magnetic rolls:
http://www.discountmagnet.com/categories/adhesive-magnetic-sheets/adhesive-magnet-rolls


In my opinion when compared to the cost of other solutions the cardboard boxes cannot be beat, especially if you have a sizeable collection.


Have Fun organizing your forces.